Code Pen Clone Using HTML, CSS and JavaScript
In the article, we will make code pen clone using html , CSS and JavaScript. First thing First we need a code editor to write our code , we will use VS Code editor you all can use according to your preference.
We start by making 3 main files - index.html , design.css and app.js
We going to use one of JavaScript Library http://ace.c9.io/ and for that we have to embed one link in our index.html file inside script tag.

Now we need to make 3 sections , one of HTML code editor , CSS Code editor , JavaScript Code Editor and one we need Output section.

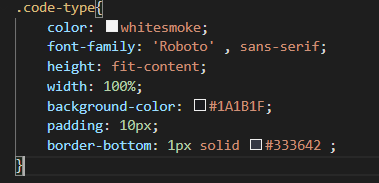
Next we have to start styling our code editor just like code pen, for that we have to make changes in our CSS file. We have to remove all the margin and padding and box-sizing is border box. Now firstly we have to give the background color and it needs to be same as code pen.
background-color: #333642;
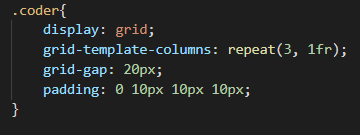
First we design our container class and we have to give height and width to 100vh and 100vw and we will use display : grid and grid-template-rows: 1fr 1fr; and it will cut the section in two equal halves.
Next , our coder class this is for each individual section. we have to cut 1 row into 3 different sections one for HTML , one for CSS and one for JavaScript.
Now, we have to design all the 3 individual sections.
After all the basic designing now come to our implementation part. Firstly, go to https://ace.c9.io/ and click on how to guide and it will guide you how you can easily configure your code editor.
Now we will edit our Script.js file.
we will write window.onload = function(){} and write all the code inside this we using window.onload cause we have to perform the function when everything is loaded.
I will explain how i work on HTML window and adds the functionality and rest 2 CSS and JavaScript functionalities of both the windows are similar.
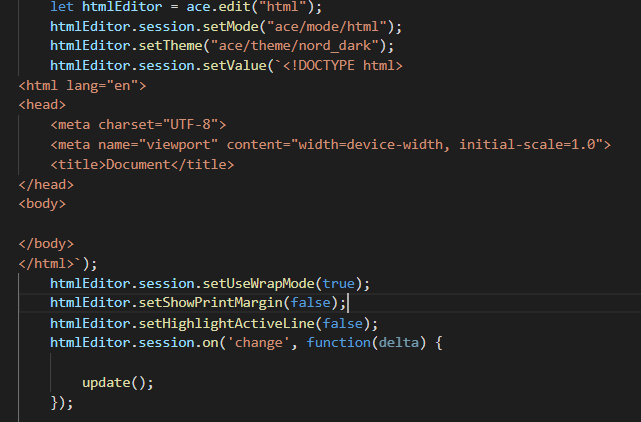
Firstly I declare one element let htmlEditor = ace.edit("html");
Now to make the HTML window works and take HTML code we will use
htmlEditor.session.setMode("ace/mode/html");
We can also set the theme for our editor and to set the theme we will use
htmlEditor.setTheme("ace/theme/nord_dark"); you have number of options to set the theme , you can choose according to your preferences
We can also set the intial value in our editor for HTML by using
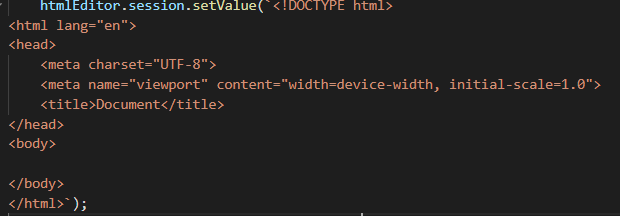
To toggle word wrapping we can use
htmlEditor.session.setUseWrapMode(true);
To set Line highlightning
htmlEditor.setHighlightActiveLine(false);
Set the print margin visibility:
htmlEditor.setShowPrintMargin(false);
This explanation is just for HTML we just we have make basic changes for our CSS and JavaScript window.
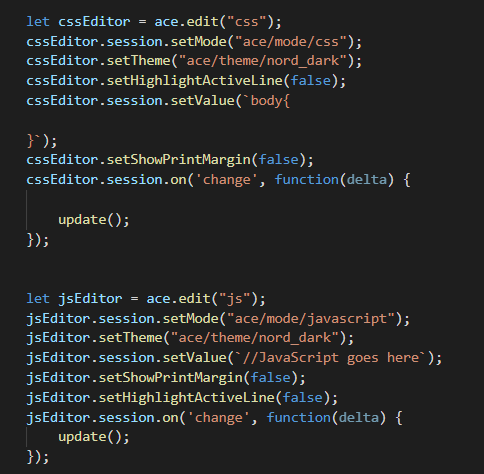
In order to run our code live we will use editor.session.on('change', function(delta) { // delta.start, delta.end, delta.lines, delta.action }); this function triggers whenever any change is discover inside our code editor or checks for change whenever change happens we want to show it in our iframe. and then we make one more function called update function and in that we are getting value written in our editor.

Now we are going to refer to our iFrame. and then we make output variable and it will refer our output and iframe class. and then we use the document.write and in that we use getvalue function to take the value from the code editor and display in our iFrame.
you can use this github link for full code sample. [link] (https://github.com/Sakshi2607-app/Code-Editor)
This is my first blog, please like and share